Icona progetto

Football and Computer Vision

Can Computer Vision Improve Football?

Problem

The following project uses the main techniques of Computer Vision to carry out Object Detection on amateur football games.

The main goal is to detect the following classes:

  • Player
  • Referee
  • Linesmen
  • Goal
  • Ball
  • Corner
  • Penalty
  • Goalkeeper

Motivation

Over time, the interest of sports clubs in issues and technologies belonging to Artificial Intelligence is growing.

The goal is to implement a system capable of providing strategic indications to coaches thanks to the modeling and techniques of Machine Learning and to develop a new gaming experience for fans.

Goals

Main objectives

  1. Dataset Preparation
  2. Object Detection
  3. Improve Detection
  4. Team Detection

Method

Dataset Preparation

In this phase i used amateur videos for the construction of the dataset, to be used for training, for each of which i implemented python scripts that allowed me to extract frames every x seconds, on which i then manually labeled the classes.

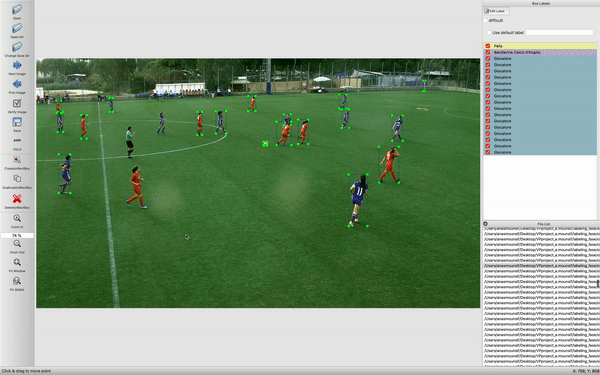
The tool used to label classes is LabelImg:

LabelImg generates for each image a file marked Yolo, for example image_1.jpg will have the corresponding image_1.txt in the same folder.

The .txt file has this type of format:

It has coordinates in Yolo format object-id, center_x, center_y, width, height.

- object-id represents the number corresponding to the category of objects that i listed in the 'classes.txt' file,

- center_x e center_y represent the central point of the selection rectangle,

- width e height represent the width and height of the rectangle,

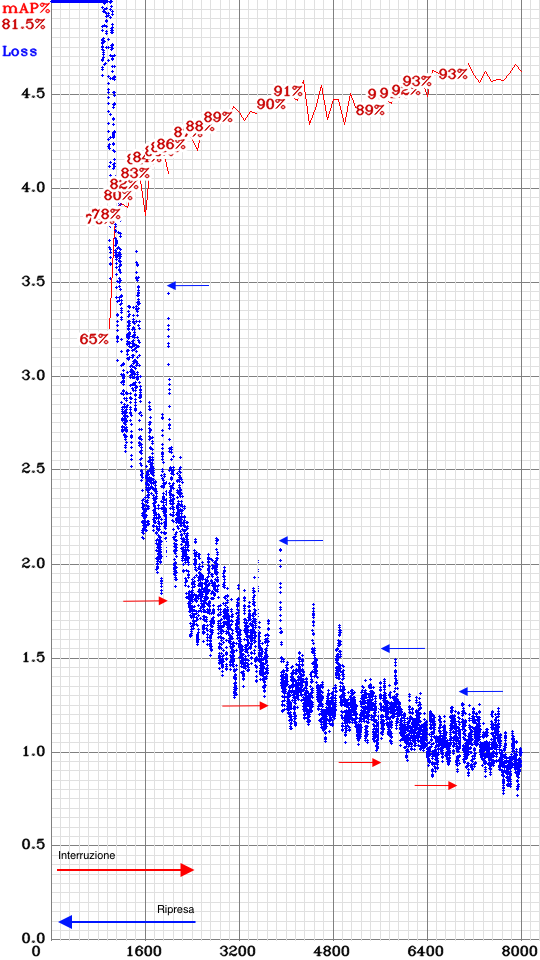
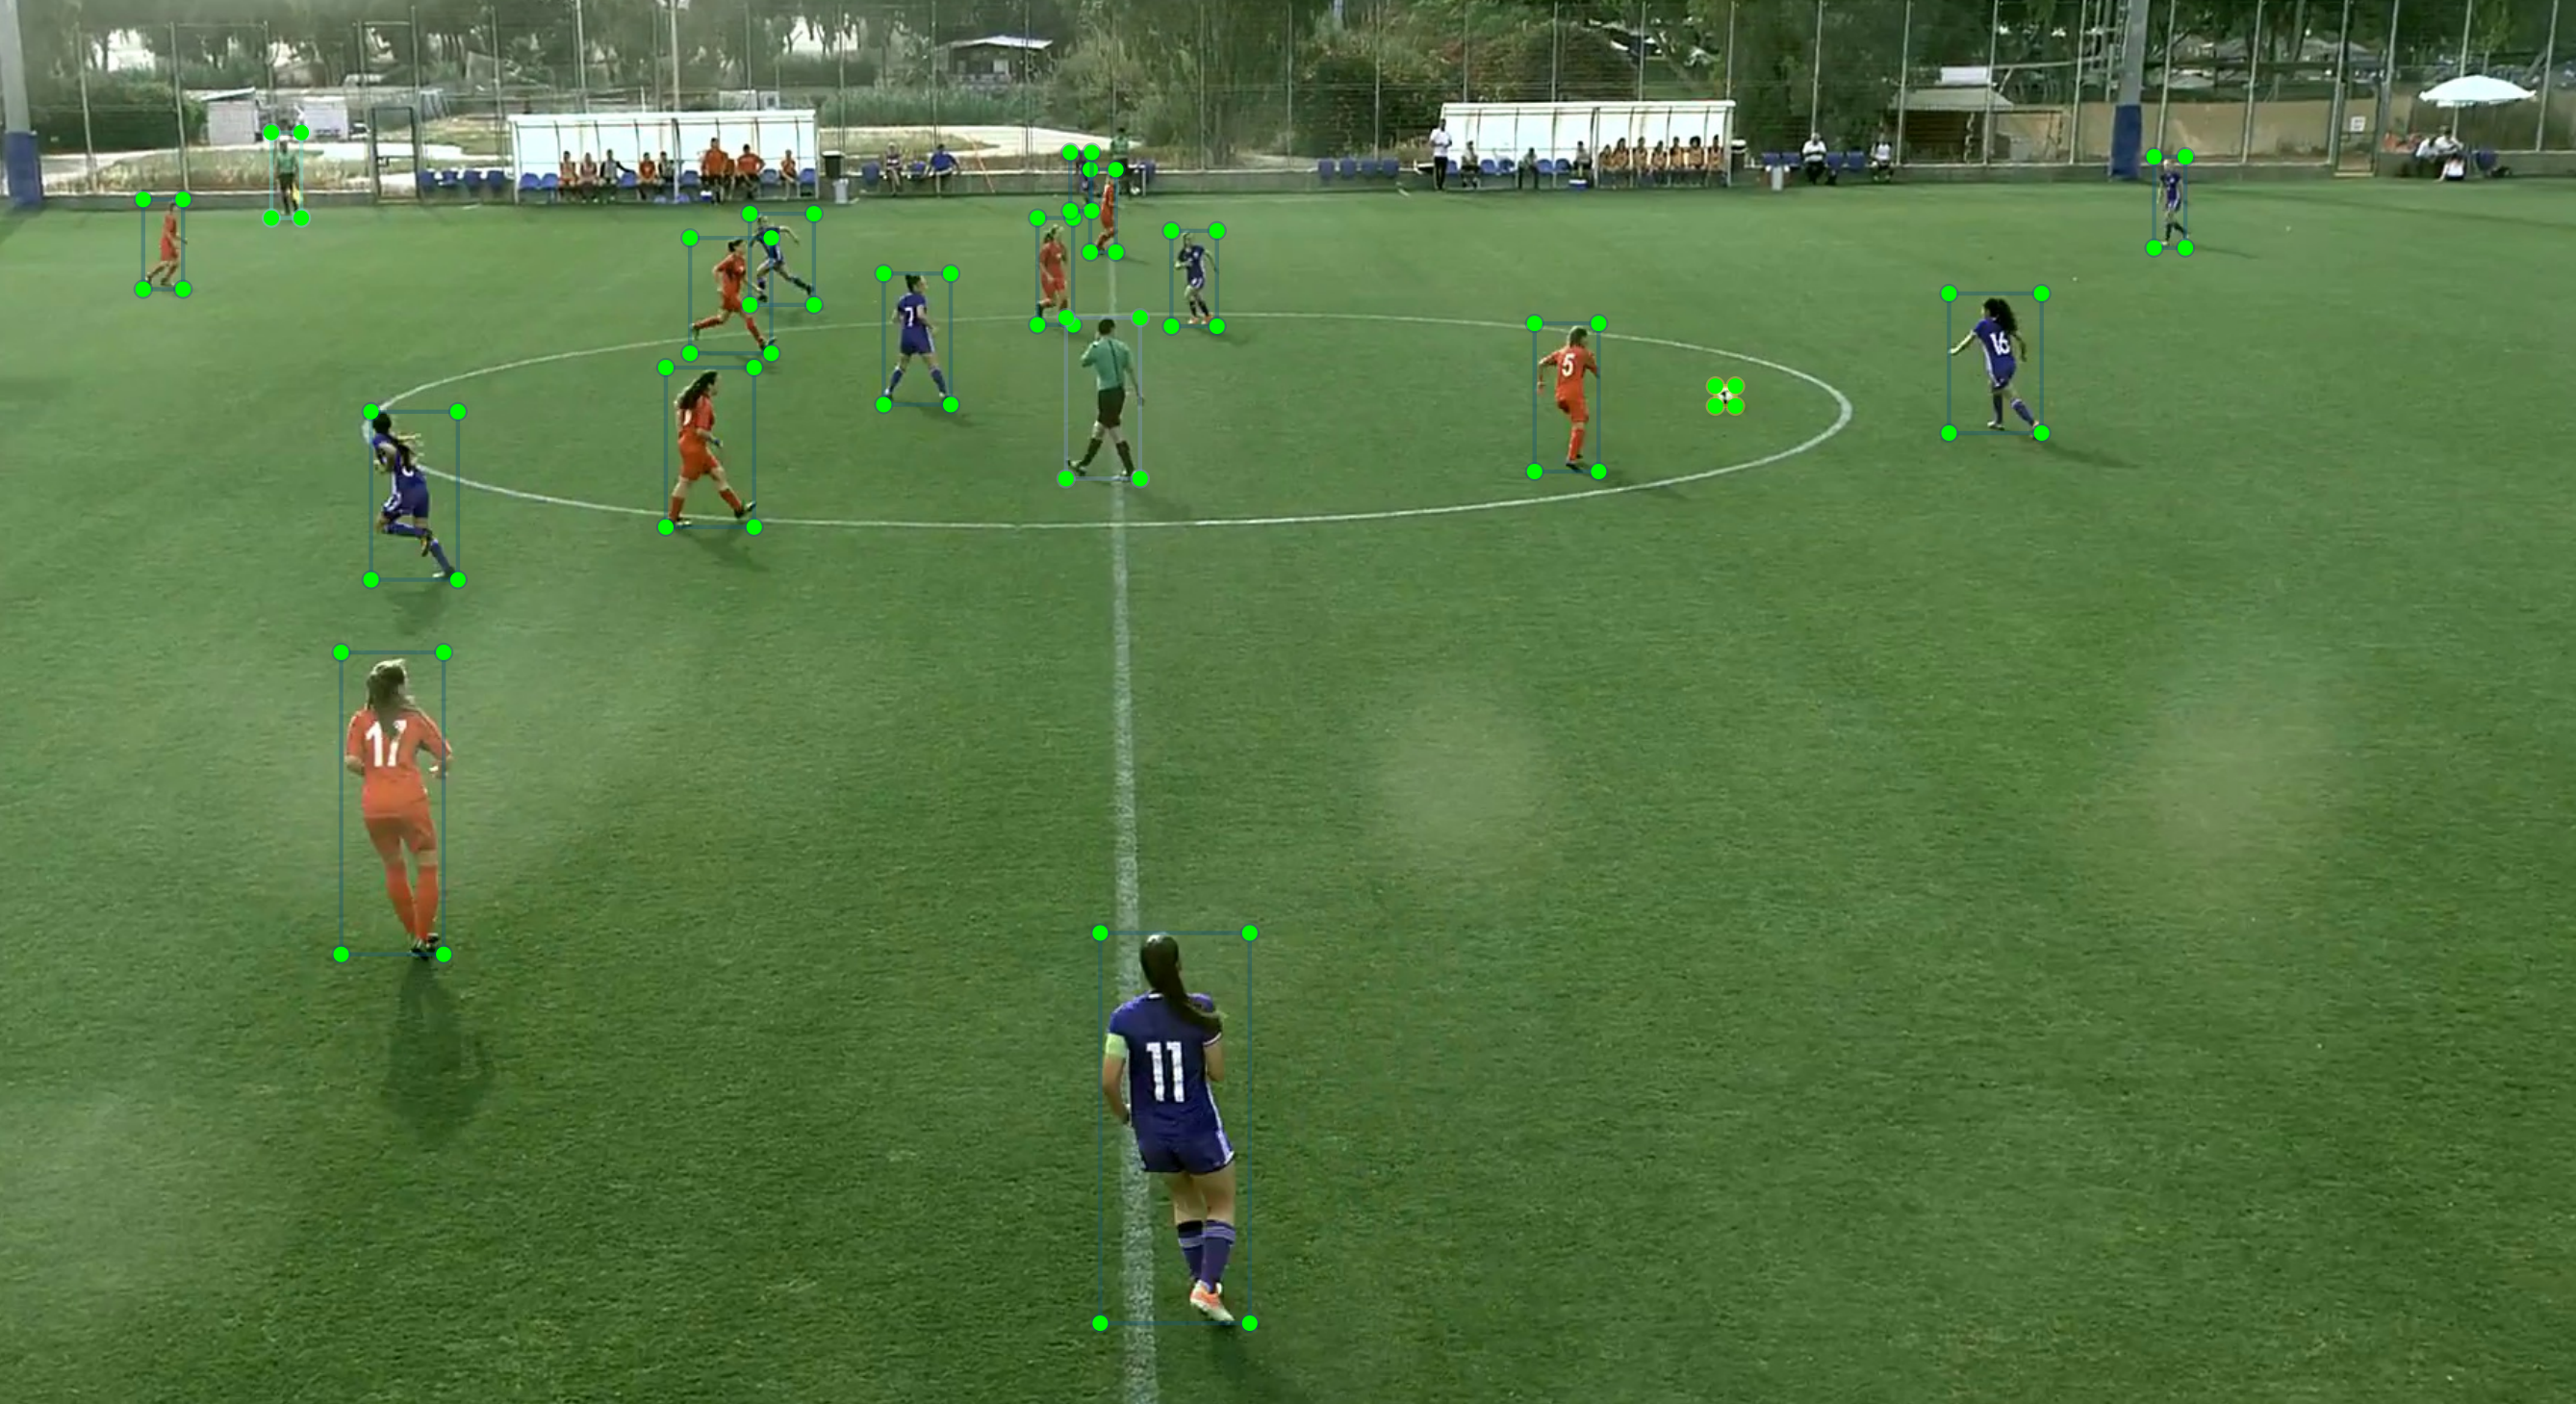
After reaching an exhaustive number of instances per class, it was possible to proceed to the Object Detection phase.


Object Detection

At this stage through the use of Google Colab and the open source neural network framework Darknet, i have implemented a notebook able to perform Object Detection.

Darknet is an open source neural network framework written in C and CUDA which supports the calculation of CPU e GPU.

In particular Darknet uses it as an algorithm Yolo (You Only Look Once), it allows you to recognize multiple objects and, at the same time, to identify their position and the space occupied by making a single reading of the input image.

The concept is to resize the image in order to obtain a grid of squares, to then be analyzed through a CNN, sharing every single cell of the grid as a real image.

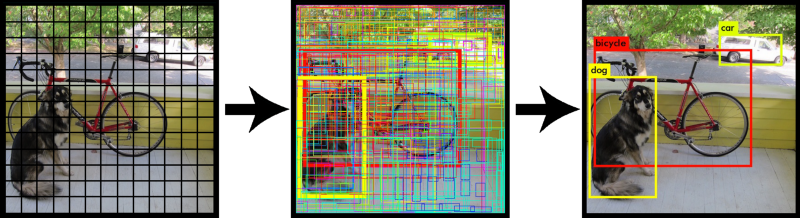
With the help of the Anchor Boxes, the algorithm is able to recognize multiple objects within a single cell, they are extrapolated directly from the training set by clustering the Bounding Boxes using K-means algorithm.

It is also able to make predictions on 3 different scales, reducing the image in order to increase accuracy.

At the end of the processing, the bounding boxes with the highest confidence are kept, discarding the others.

The biggest advantage of using Yolo is its superb speed, it's incredibly fast and can process 45 frames per second, also understands generalized object representation, this is one of the best algorithms for object detection.

The following project uses YOLO 4 version that uses Data Augmentation

The purpose of data augmentation is to increase the variability of the input images, so that the designed object detection model has higher robustness to the images obtained from different environments, so YoloV4 adjust the brightness, contrast, hue, saturation, and noise of an image.

For geometric distortion, performs random scaling, cropping, flipping, and rotating.

It also introduces new activation functions among which i used in the project:

  • Mish: A Self Regularized Non-Monotonic Neural Activation Function.

Implementation and Code

In order to use the tool LabelImg and utility scripts, Python and OpenCV must be installed on the local machine.

1 - First of all find the video you want to do dataset preparation on,

2 - Run the script to extract the images from the video,

3 - Now you need to install LabelImg on the machine so that you can labelize the images:

4 - Create the classes.txt file which will contain the name of the classes,

5 - Once labelImg is successfully installed, launch it by typing:

$ labelImg [path to image] [classes file] 

For example:

$ labelImg /home/Downloads/dataset_preparation/frame1.jpg classes.txt 

6 - Let's use the tool:

7 - Run the script to check the instances per class totalized,

8 - After having enough images, you can go to the Google Colab platform for training and detection.

9 - However, i had to solve two main problems, the first problem concerns the non-use of the Colab notebook for over 30 minutes, beyond which the session will stop, the second problem instead, concerns the overflow of the output produced by the cells, using this script these two problems will be solved.

  • Enter a new shortcut for the entry Clear all outputs and edit the script with the new shortcut.

The solution is to clean the output of all cells every x seconds in order to deceive google that we are active.


Jupyter Notebook preview is rendered below:

For the interactive notebook: Google Colab,

For the resources of the whole project: Google Drive,

Dataset

The built dataset consists of 500 images and 500 corresponding .txt,

Instances per class:

Class Instances
Player 7461
Referee 396
Linesmen 369
Goal 276
Ball 428
Corner 413
Penalty 146
Goalkeeper 338

Results

Qualitative Results


Quantitative Results

In Darknet it is necessary to divide dataset to 3 (train, val, test), only in 2 cases:

  • (train ~5%, val ~80%, test ~15%) - to train on small Train-set, then Fine-tune on Val-set with frozen most of layers, and then check mAP on Test-set

  • (train ~80%, val ~10%, test ~10%) - to use double-blind checking, you send Train and Val sets to another person, who will train on Train-set and check mAP on Val-set, then you want to check whether he cheat you and you receive the model from this person and you check it on Test-set that he didn't have
In other cases should divide dataset only to 2 (train, val).


So to get the highest IoU for valid, i used all the images for both validation and training.

Precision measures how accurate is your predictions, Recall measures how good you find all the positives, IoU measures the overlap between 2 boundaries and Average precision computes the average precision value for recall value over 0 to 1.


Results related to 500 images,

- 1000 iteration result:

Class TP FP %
Player 7088 389 95.76%
Referee 345 99 87.16%
Linesmen 233 107 57.73%
Goal 271 86 92.34%
Ball 203 212 37.02%
Corner 269 157 51.85%
Penalty 44 149 9.69%
Goalkeeper 309 120 88.61%

Precision = 0.87, Recall = 0.89, F1-score = 0.88, TP = 8762, FP = 1319, FN = 1075, Average IoU = 65.79%

Mean Average Precision = 65.02%


- 8000 iteration result:

Class TP FP %
Player 7315 124 98.48%
Referee 389 12 98.79%
Linesmen 374 22 98.87%
Goal 276 11 99.99%
Ball 371 68 85.27%
Corner 405 16 97.11%
Penalty 106 45 61.44%
Goalkeeper 333 12 99.18%

Precision = 0.97, Recall = 0.97, F1-Score = 0.97, TP = 9569, FP = 310, FN = 268, Average IoU = 80.80%

Mean Average Precision = 92.39%


Learning Curve

As we can see, as the iterations increase, the Avg Loss decreases and mAP increases.

Opencv Detection and Tracking

In the previous sections i carried out object detection using the native darknet framework, in this section instead i will go to handwrite the detection using opencv, tracking techniques, and the model obtained from training with darknet.

The first thing to do is to install opencv 4.3.0, changes have been made in this release to allow opencv to recognize the new activation functions used by Yolov4 (Mish).

The operating system used is linux ubuntu installed on the virtual machine.

Therefore the thing to do is to run the script specifying the configuration parameters inside the code.

$ python3 path_to_script/script.py 

After running the script you will get the following results:

Tracking slightly improves detection, but to obtain even more accurate detection the best way is to provide training with a larger dataset.

Whoever has the best algorithm does not win, but whoever has the most data wins!

Team Detection Using Opencv

In this section, in addition to detect and track the various classes, i will classify each team according to the color of the football uniform.

The idea behind it is to use Opencv to identify the mask on specific colors in order to identify the teams.

I converted the image from BGR to HSV colour space, in HSV space it is then necessary to specify colour ranges for red and black colours, as well as mask pixels that are in the threshold range and colour in black any pixels not in the mask.

To identify team for each individual player i extracted bounding box from YoloV4 object detection and count the percent of pixels in that bounding box that are non black to decide the team for the detected player.

To try the script just download the modified script , changes have been made to recognize the teams.

Therefore specifying the configuration parameters inside the code and:

$ python3 path_to_modified_script/modified_script.py 

After running the script you will get the following results:

The above mentioned script is specific for the detection of red and black, to recognize teams that have different colored shirts it is necessary to change the color ranges, so the next step could be to implement an automatic detector of the 2 dominant colors using for example K-means.